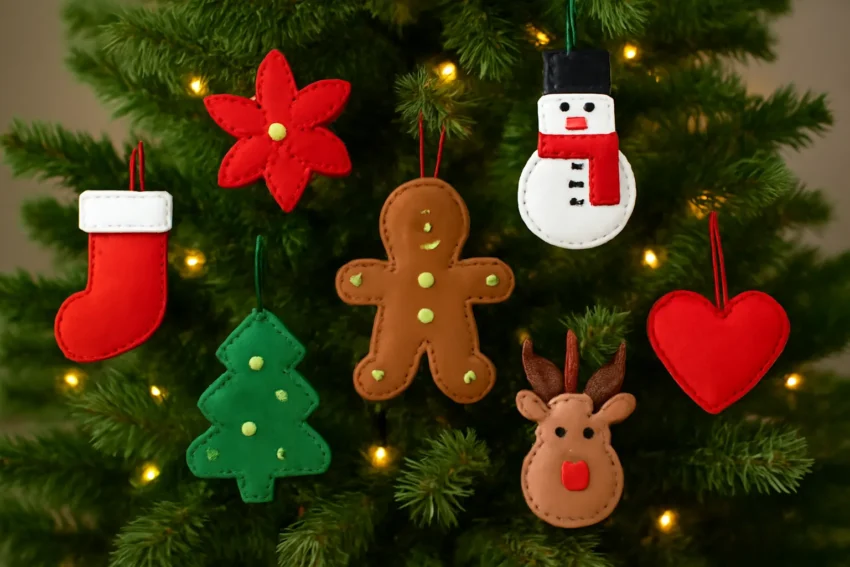
Overview: Why choose felt decorations for a Christmas tree
A felt Christmas tree or a tree adorned with felt decorations blends charm, safety, and sustainability. Felt is a versatile, easy-care material that comes in a rainbow of colors and textures, making it ideal for a wide range of holiday craft projects. Unlike fragile glass ornaments, felt ornaments are sturdy, lightweight, and kid-friendly, which makes them particularly attractive for families, classrooms, and DIY enthusiasts who want to personalize their holiday décor. In addition to being approachable for beginners, felt-based ornaments can be designed to reflect personal interests, seasonal motifs, and family memories. This article offers step-by-step tutorials and practical ideas to help you create a cohesive look—whether you prefer classic red-and-green palettes, Nordic minimalist aesthetics, or glamorous metallics.
Throughout this guide, you will encounter a variety of formats: practical how-to instructions, pattern tips, and creative project ideas that cover everything from simple handmade ornaments to more complex decorative garlands and tree toppers. You’ll also learn how to scale projects, trace and cut shapes, assemble pieces with a range of stitches, and care for your felt creations so they stay bright year after year. By choosing felt, you’re leaning into a material that is approachable, forgiving, and endlessly customizable—perfect for building a beautiful, cozy Christmas tree with felt decorations.
Materials and tools: what you need to start creating felt ornaments
Before you dive into your first felt decorations for the Christmas tree, gather a core set of tools and materials. A well-stocked workspace makes the process smoother and more enjoyable, and it helps you achieve clean edges, crisp stitches, and durable ornaments.
Felt sheets in a range of colors. Choose a core palette (for example, evergreen, cream, red, and gold) and add accent colors as you plan more elaborate pieces.
Sharp scissors or a rotary cutter with a cutting mat for precise shapes.
Pencils, chalk, or disappearing ink pens for tracing patterns onto felt.
Templates or pattern sheets (you can print simple shapes or draw your own on cardboard or plastic).
Needles suitable for felt and embroidery floss. A sharp tapestry needle or chenille needle works well for simple hand-stitching.
Threads in cotton embroidery floss or perlé thread. Use a color that matches your felt or a contrasting color for decorative stitching.
Stitching techniques such as backstitch, running stitch, blanket stitch, and ladder stitch for closing shapes.
Glue (optional) for quick assembly. A hot glue gun can help with non-sewn parts, but use caution with hot glue near children.
Stuffing such as polyester fiberfill or cotton batting for three-dimensional ornaments.
Beads, sequins, tiny buttons, and embroidery accents for texture and sparkle (optional).
Wire for hangers or durable strings/ribbons for hanging on the tree.
Iron or fuse tools for pressed appliqués (optional, depending on your technique).
For sustainability and safety, consider using recycled felt or scraps from other projects. This not only minimizes waste but also adds a rustic texture to your decorations. If you’re working with kids, you might prefer pre-cut felt shapes and blunt-tipped embroidery needles to keep the activity safe and enjoyable.
As you plan your felt ornaments collection, think about storage: a reusable storage box with dividers helps keep pieces organized by color and size, making it easier to assemble the tree year after year.
Basic techniques: stitches and construction for felt ornaments
Before launching into a full ornament, it’s helpful to master a few fundamental techniques that you’ll use across many projects. These methods keep pieces secure, neat, and attractive.
Cutting clean shapes: Always line up the pattern with the felt grain if necessary and cut slowly to prevent fraying. For small shapes, using small, sharp scissors or a precision knife will improve accuracy.
Blanket stitch: A classic edging stitch that creates a decorative outline around felt shapes and also joins multiple layers together.
Running stitch and backstitch: Great for outlines or simple detailing. These stitches are strong and easy to master for beginners.
Layering and appliqué: Place smaller shapes on top of larger ones, then stitch around the edges to create a dimensional effect.
Stuffing for dimension: Lightly fill shapes with fiberfill to give ornaments a plump feel without making them bulky.
Assemblies: Plan whether an ornament is two-dimensional (flat) or three-dimensional (slightly rounded). For 3D shapes, you’ll usually sew two halves together, then stuff before closing the final seam.
Practice projects can help you get comfortable with these techniques. Start with simple shapes like circles, stars, or hearts, then gradually try more complex forms such as bells, trees, and animals.
Beginner projects: simple felt ornaments to kick off your collection
Project 1: Felt star ornament
Stars are classic, versatile, and quick to make. This project teaches a few essential skills—cutting symmetrical shapes, stitching a border, and adding a tiny embroidered detail for a pop of contrast.
Materials: 2 felt sheets in contrasting colors, embroidery thread, needle, scissors, fiberfill (optional), ribbon for hanging.
Steps:
Trace and cut two identical star shapes from felt.
Optional: cut a small slit on the back star to insert a bit of stuffing for a soft, dimensional look.
Stitch the two shapes together along the edges with a blanket stitch, leaving a small gap for stuffing if desired.
Stuff lightly, then finish closing the seam. Add a simple back-stitch or tiny running stitch in a contrasting color to add a decorative outline.
Attach a ribbon loop at the top for hanging.
Tips: Keep stitches even for a polished border; use a contrasting thread to highlight the outline if you like bold accents.
Snowflakes are ideal for a wintery theme and can be made in several sizes. You can add a light sparkle using beads or metallic thread.
Materials: White or pale blue felt, embroidery floss, beads or tiny sequins (optional), tiny needle for beadwork, stuffing (optional).
Steps:
Cut two identical snowflake shapes or a single snowflake outline with inner cutouts for a lace-like effect.
Stitch around the edges with a neat blanket stitch. If you want a stitched lace look, leave most edges for a light tension and decorative center.
Decorate the front with small beads along a few arms. Add stuffing sparingly if you prefer a slightly rounded ornament.
Sew on a hanging loop at the top.
Tips: For a cleaner, more delicate look, use a fine needle and scale down the details; metallic threads or silver beads emphasize a frosty feel.
Project 3: Mini gingerbread man
A playful nod to classic Christmas imagery, the gingerbread man can be made in traditional brown or in fun colors like peppermint red or pastel tones.
Materials: Brown felt (or any preferred color), cream or white embroidery floss, black and red embroidery floss for eyes and details, needle, scissors, stuffing (optional).
Steps:
Cut two gingerbread-man shapes and a few small embellishments (buttons, mouth, apron, etc.).
Stitch features using a backstitch; you can also couch small yarn tufts for texture.
Stuff lightly and sew the shapes together. Attach a small loop at the top for hanging.
Tips: Personalize with a family name initial or holiday greeting on the belly using a contrasting thread.
Project 4: Snowy pine cone accent
Combine natural imagery with a tactile feel by crafting pine cone shapes with a snowy highlight.
Materials: Greens and browns felt, white felt for “snow,” thread in coordinating colors, needle, optional stuffing.
Steps:
Cut two pine-cone shapes and a second inner piece to create a gentle curve.
Stitch together along the outer edge; add a white tip or dotting to simulate snow.
Top with a small loop for hanging.
Tips: Use layering of greens to create depth and texture reminiscent of real pine cones.
Intermediate ideas: building complexity with texture and dimension
Ornament garlands: a coordinated felt banner
Instead of a single ornament, create a felt garland that drapes along branches or around the tree skirt. This approach yields a cohesive, salon-style display while remaining approachable for crafters with a little more experience.
Materials: Small felt shapes (stars, circles, bells, trees), embroidery floss, thin ribbon or twine, needle, scissors, optional beads for a dotty look.
Steps:
Prepare a series of shapes in varying sizes. For balance, cut multiple copies of a few shapes and in a few colorways.
Stitch a short phrase or seasonal words on some shapes for a personal touch (e.g., “Joy,” “Peace,” “Noel”).
String shapes onto a length of ribbon or twine with equal spacing. Tie off each end and leave a little extra twine for hanging.
Tips: Plan the color palette ahead of time to ensure harmony with the tree and other decorations.
Three-dimensional felt tree topper: a soft star or angel
A three-dimensional topper adds a focal point to your felty Christmas tree setup. You can craft a soft star or an angel with volume that sits snugly atop the tree.
Materials: Cardboard or stiff interfacing for a shallow base, several felt layers in a coordinating palette, stuffing, thread, and a long hanger loop.
Steps:
Cut two or three layers of the shape (star or angel) in varying sizes, plus a backing piece.
Assemble with a generous seam and stitch around the edges. Leave a hole for stuffing, then seal after adding dimension.
Attach a sturdy hanger at the back and secure to the apex of the tree.
Tips: For extra sparkle, add metallic threads or a few beads to the topper’s features.
Three-dimensional felt garland knots
Elevate your garland by turning basic felt shapes into three-dimensional knots or tassels. This adds movement and a tactile element to the tree, especially in spaces with children.
Materials: Felt loops, ribbon, embroidery floss for tying, tiny bells or beads (optional).
Steps:
Cut small felt rectangles and fold them into three-dimensional shapes, securing with a few stitches or tiny knots.
Attach to a length of ribbon or twine at regular intervals.
Seal ends with a small amount of glue to prevent fraying if you’re using loose threads.
Tips: Use a consistent scale for all shapes to maintain a harmonious look along the garland.
Patterns and templates: how to design your own felt ornaments
A big part of making a Christmas tree with felt decorations is patterning. Whether you draw shapes by hand or print out templates, patterns help ensure consistent sizing and symmetry across ornaments.
Start with simple shapes: circles, hearts, stars, bells, and trees are excellent starting points. Use a standard seam allowance if you plan to stitch two pieces together.
Scale your templates: For a balanced tree, plan several sizes of shapes. A small cluster of tiny ornaments pairs nicely with larger focal pieces.
Mirror images for symmetry: When you need two identical halves (for 3D shapes like stars or bells), cut one template and flip it to create the second half.
Trace and cut: Use chalk pencils or washable markers to trace shapes onto felt. If you use chalk, test color transfer on a scrap piece first to avoid staining the fabric.
Templates from recycled materials: Cardboard, cereal boxes, or plastic folders can become durable pattern stock. Cut out your shapes, then trace around them onto felt to create multiple ornaments quickly.
Preserve patterns for future years: Store cardboard templates in a labeled folder or a zip-top bag. This makes repeat holiday crafting easy year after year.
If you’d like a more guided approach, start with a PDF or printable template pack that includes basic shapes and a few seasonal motifs. You can recreate these patterns, adjust scales, or remix them with your own color palettes.
Color palettes and design ideas: crafting a cohesive tree with felt decorations
The palette you choose for your felt ornaments sets the mood for the entire tree. Felt accepts bold color contrasts as well as soft, muted tones. Below are some popular themes to consider, with tips for achieving a polished result.
Classic red, green, and cream: A timeless, traditional look. Mix candy-cane stripes with polka dots on ornaments and balance with a few metallic accents.
Nordic hygge: Neutral tones, warm whites, soft taupe, and a touch of charcoal. Use simple silhouettes (stars, snowflakes, animals) in a consistent, understated palette.
Rustic natural: Forest greens, browns, and cream with natural textures. Add burlap ribbons or wooden bead accents for a woodland feel.
Glam metallics: Deep green, black, gold, and copper. Use metallic threads or beads sparingly to keep a refined, elegant look.
Whimsical rainbow: A playful approach with a spectrum of bright colors. Stack shapes of various hues to create a vibrant, festive display.
To maintain harmony, keep a balance between shapes and colors. A common strategy is to choose a dominant color and two or three accent colors, then introduce a few high-contrast shapes to capture attention without overwhelming the tree.
Care and maintenance: keeping felt decorations looking fresh year after year
Felt ornaments are durable, but they benefit from gentle care. With proper storage and occasional upkeep, your felt Christmas tree will stay bright and joyful for many years.
Cleaning: Gently dust ornaments with a soft brush or a lint roller. If needed, spot-clean with a damp cloth and mild soap, then air-dry completely before storing.
Storage: Store in a breathable container away from moisture. Put each piece in its own small bag or wrap in tissue to prevent color transfer. Label the boxes by color family or by ornament type for easy retrieval.
Repairs: If a stitch comes loose, re-sew with a matching thread sooner rather than later to prevent further unraveling. A small dab of fabric glue can secure loose edges on non-sewn parts, but avoid excessive glue that can stiffen the felt.
Color retention: If you’re storing pieces with metallic threads or beads, ensure they are well-sealed to prevent tarnish or transfer onto other shapes.
Proactively inspecting and repairing your felt ornaments keeps the family heirloom vibe intact. Felt holds shape well; with a little care, these decorations can become cherished staples of your holiday tradition.
Kids, learning, and safety: family-friendly felt projects
Working with felt is an excellent way to introduce children to crafts while keeping the process safe and enjoyable. Felt does not fray easily, and most projects involve stitching with blunt needles or using fabric glue under supervision.
Kid-friendly activities: Pre-cut shapes, simple sewing with large stitches, and friendly motifs like animals and candy canes are great for little hands.
Safety considerations: Use blunt-tipped needles for kids and supervise glue use. Avoid small beads for very young children who might attempt to swallow them. Always choose material colors that are non-toxic and suitable for children’s crafts.
Educational angles: Turn ornament making into a mini lesson in color theory, measurement, and pattern repetition. You can track which shapes are created and which colors are used most, turning the activity into a light math exercise as well as a creative outlet.
A well-planned family craft day can yield a stunning collection of felt ornaments that reflects the kids’ interests and the family’s shared memories.
Projects for advanced crafters: complexity, texture, and mixed-media accents
Felt tree ornaments with embroidery details
Elevate plain shapes with small embroidered details such as running stitches, French knots for berries, or satin stitches for leaves. Embroidery adds a tactile dimension and a handcrafted vibe.
Materials: Felt shapes, embroidery floss in multiple colors, embroidery needles, optional beads or French knots.
Steps:
Outline the seams with a backstitch in a color that complements the filled area.
Layer small embroidered motifs (e.g., berries on holly leaves or stitches along the border) for a decorative effect.
Finish with a hidden back stitch to secure the inner layers, then attach a hanger.
Tips: Use sub-stitches to create subtle texture; vary the thread thickness to add depth.
Layered felt ornaments: depth and dimension
Layering multiple felt pieces creates depth and a three-dimensional look without adding excessive bulk. This technique is ideal for animals, fruit, or seasonal motifs.
Materials: Several colors of felt, fusible web interfacing (optional) or fabric glue for quick layering, decorative stitches.
Steps:
Cut a base shape and several smaller shapes to lay on top. Use fusible web or a light glue to adhere the layers.
Stitch around the top layers to secure and outline each piece; consider leaving the back side flat for a low-profile ornament.
Attach a loop and finish.
Tips: Choose color combos that create contrast and shadow for a convincing layered effect.
Felt animals: woodland creatures and holiday friends
Animal motifs add whimsy and storytelling to your tree. Think red-nosed reindeer, foxes in winter colors, owls wearing tiny scarves, or penguins perched on snowy branches.
Materials: Felt in a variety of colors, embroidery floss, small buttons for eyes, and stuffing for volume.
Steps:
Cut multiple pieces to assemble a small animal with a cute face and features.
Sew features with a neat backstitch; add tiny accents such as a scarf or hat from contrasting felt.
Stuff lightly and close, then attach a hanger.
Tips: Keep the shapes simple at first; as you gain confidence, try more complex silhouettes with defined limbs and figures.
Seasonal storytelling: turning felt into a narrative for your tree
A well-curated collection of felt decorations can tell a story across the branches. Consider creating a “country village,” a “winter forest,” or a “festive market” scene using small felt houses, trees, market stalls, animals, and characters. Such a scene can be displayed on the tree or arranged around the base with a felt tree skirt piece acting as the stage.
Scenes: Each ornament can represent a moment or symbol—an ice-skating bear, a pinecone gathering, a Christmas market stall, or a snow-dusted cottage.
Color coding: Use a dedicated color family for the entire scene to keep the narrative cohesive.
Layering: A layered approach with background trees, foreground figurines, and small props creates depth and invites closer viewing.
The storytelling approach adds a sentimental layer to your felt Christmas tree and invites guests to explore the handmade details up close.
Practical design tips for a cohesive felt Christmas tree aesthetic
Whether you’re starting a new collection or expanding an existing one, a few practical design tips help you achieve a polished, gallery-like appearance on your tree.
Plan ahead: Sketch a simple layout for your tree decorations before you start cutting. This helps you balance color, shape variety, and sizes.
Group by color: Keep a few color anchors (e.g., a dominant green, a secondary red, and an accent cream) and distribute shapes evenly to avoid clustering.
Vary the scale: Mix large ornaments with small ones to create a dynamic rhythm. A few oversized shapes can serve as focal points while smaller pieces fill the gaps.
Think texture: Combine flat ornaments with lightly stuffed pieces to add tactile interest. A tuft of yarn, subtle embroidery, or a beaded detail can elevate the texture without complicating assembly.
Maintain balance: If the top-heavy look feels too dense, reduce the number of ornaments on the upper branches and allow more space for the tree’s silhouette to breathe.
A well-planned arrangement benefits from a balance between unity and variety, ensuring your felt decorations complement the tree while standing out on their own.
DIY tutorials: quick-start guide to a first complete felt-based Christmas tree collection
If you want a practical, end-to-end approach, here is a compact guide to design, cut, sew, and assemble a first set of felt ornaments and a simple garland that works together with a traditional evergreen tree look.
Step-by-step plan: build a starter kit of felt decorations
Step 1: Choose a theme (classic, Nordic, or glam). Decide on a palette of 4–6 colors and a handful of shapes (stars, snowflakes, bells, pine cones, and animals work well).
Step 2: Gather basics (felt in chosen colors, needles, thread, scissors, pattern templates, and a small amount of stuffing).
Step 3: Cut shapes using templates. Cut two of each shape for two-sided pieces or keep flat for a flat-dangling effect.
Step 4: Stitch and assemble—choose a combination of running stitches for detail and blanket stitches for edges. Stuff as desired, then close.
Step 5: Add hangers—thread a loop of ribbon or twine at the top of each ornament; secure with a few stitches or a knot behind the ornament.
Step 6: Create a garland—cut small shapes and string them on a length of twine with even spacing. Tie off the ends and secure loops for hanging on the tree or around a mantle.
Step 7: Arrange—place larger pieces toward the center and higher on the tree, then fill in with smaller pieces and decorative accents.
This starter plan is designed to deliver tangible results quickly while offering room for customization. As you gain skill, you can revisit and expand your collection with more ambitious motifs and layered textures.
Creative variations: themed decor ideas for different spaces
Felt decorations are adaptable to many spaces, from cozy living rooms to children’s bedrooms and even office décor. Here are a few themed ideas you can implement to tailor your Christmas tree with felt decorations to your environment.
Kid-friendly tree: Combine bright primary colors, friendly animals, and simple shapes. Keep shapes large enough for little hands to handle, and avoid tiny pieces that could be a choking hazard for very young children.
Minimalist Nordic tree: Use a restrained palette of 3–4 neutral colors and simple silhouettes like stars and trees. A quiet, peaceful look works well in modern interiors.
Glam holiday tree: Add metallics (gold, copper, silver) and a few jewel-toned accents on black or dark green felt to create a luxe display.
Rustic woodland tree: Combine greens, browns, and creams with natural textures like burlap and wood bead accents for a cabin-inspired vibe.
Whimsical candy land tree: Use pinks, purples, mint greens, and candy-themed shapes (lollipops, candies, peppermint swirls) for a playful, festive look.
Regardless of the space, felt decorations enable you to tailor patterns, colors, and textures to the room’s lighting and style. The result is a memorable and personal holiday display.
Closing thoughts: a lasting tradition of handmade felt ornaments
Creating a Christmas tree with felt decorations is more than a craft project; it’s a chance to invest in a handmade tradition that can be shared across generations. Felt is forgiving for beginners, yet robust enough for intricate projects that challenge seasoned crafters. Whether you’re building a small set of keepsake ornaments, crafting a full garland, or designing a dramatic tree topper, felt offers endless opportunities for creativity, customization, and memory-making. The techniques outlined in this article—ranging from basic cutting and stitching to layered textures and story-driven designs—provide a solid foundation for exploring the full spectrum of felt-based holiday décor. With thoughtful planning, a cohesive color story, and a little patience, you can create a Christmas tree that feels uniquely yours and lasts for many seasons to come.